12.28.2010

burlap table runner

Here is the DIY burlap table runner.  I appreciate how easy they are to make.


My sister and I actually came up with the idea.

She is one creative chick. Check out her blog The Wanna Be Cottage.


So here is how you achieve this runner.


You first will have to measure the width and desired length.


I have mine hanging down over my table 9" on both sides.


My width is 15". Once you have figured out what you want, CUT!


Next sew along the edges.

I enjoy the frayed look, so I didn't do this for mine.


The most important step is to choose a color.

Here are 4 that we thought would look really great.


The turquoise won my vote.


Tape and paint. Work in sections.


Here is where you creativity steps in.


I did two strips 1/2" w. The strips are 10" apart.


You could do one big strip down the middle with two smaller strips beside.

The Burlap will look great with almost anything you choose.


Let the paint dry, and peel the tape off. I did have to touch it up in some places.


One great runner, and I didn't have to break my budget.


If you try this send me your picture.  I would love to see your creativity.


Here is a party I joined

Todays Creative Blog          Remodelaholic

Vintage Wannabee           The Lettered Cottage

Blue Cricket Design         Crazy Domestic

tea rose home

Until next time,
Melissa

12.26.2010

accessories for the outdoors.

Treats everyone can enjoy , are always lovely to make.


Acorn bird seed treats sounded perfect, for our beautiful birds in the woods.


I seen this handsome male cardinal the other day. I will name
this one Craig.


That is when the wheels started turning.


Craig needs a gift,  and some female friends.


why not try to attract some critters with these awesome acorn delights!


Here is how we made these beauty's.


Supplies you will need.

Peanut Butter
Bird Seed
Acorns ( I collected these from fall)
Jute
Hot glue


I put a dab of hot glue on top, and spun the jute around, to resemble the top of an acorn.


My father was super impressive and created this triple threat.


After many burns, we finally had all of the jute attached.


Apply the peanut butter anyway you want, finger, spoon, knife, I think you get the point. 


I think my mother was having to much fun.


Roll the acorns in bird seed.


Now take a break, and eat spoon fulls of peanut butter.


Tie them to the trees. I would make sure to have someone tall do this.


Do not jump in the snow, you may eat it!!!


The treats look great hung all together.


I wonder if the birds will admire the view.


I adore the way the triple treat looks.


Im linked up here
DIY CLUB

DIY Showoff


Until next time,
Melissa

12.23.2010

Forest of Trees

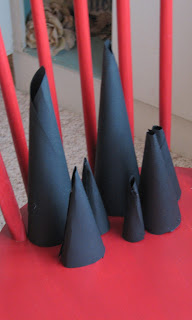
I am on a last minute decorating frenzy. I quick ran to the store and picked up some supplies to make these.


Crepe paper trees, they are so much fun, and easy to make.


I found these darlings on a website called Creative Chaos.

She gives a very good  tree tutorial.

Finished product.

.
I love how easy these were, and my children could help. I left mine simple, you could do anything your heart desires.


Spray on glitter, was the one thing I used.


Red, silver and white.


You sew the crepe paper to give them a ruffled look.


 I set my sewing machine at 9 tension and 0 width.

Baylie pushed the pedal, and we were off and running.


I made tree forms in all different sizes.

It looks like a tiny crepe tree forest, in the middle of my table.


The grey turned out lovely. The glitter lays quite nice on the tree.


The one on the far left, Baylie made,  notice the blue glitter.


Thank You creative chaos for my wonderful tree forest center piece, and blistered fingers.


I am linked up here


Until next time,
Melissa

12.22.2010

Touch of Turquoise

Chipped up Turquoise paint dresses up my ordinary white hutch.


I found this beauty with one door off, and taped up wooden handles. It was a steal, and I could not leave it out in the chilly spring rain.


I love the color of this pitcher.


What a challenge this was to bring it home. We loaded it in my brother in laws truck, and frantically hunted down a place to find a tarp. The storm clouds were rolling in.


A few stores later we found a tarp. Two wet shirts and my pearl was safely covered.


We celebrated with double downs from KFC. I felt sinful just looking at this thing.


I wish I would have taken a before picture, but I was filled with excitement when my husband put it in our dining room.


My determination was to doctor this treasure up as soon as possible


New hinges were needed to attach the doors.


A fresh coat of white paint gave this hutch new life.


Green and ideal, anthropologie knobs enhance this one of a kind hutch.


I added beloved accessories.


old door knob, my favorite accessory in the hutch.


The hutch is exactly what I had envisioned.


Check out these site Im linked to.

the shabby chic cottage

beyond the picket fence

house of hepworths

Funky Junk Interiors

DIY CLUB


Until next time,
Melissa

12.20.2010

Barn Door Table

Hinges, and latches adorn my kitchen table. An old barn door, attached to some legs, and perfection.

The door became a beautiful kitchen table.


The plain wood legs, and base needed something, so a white wash, and paint stained clothes was a must.


Looking at all the imperfection of the door, remind me how beautiful old and used items are.


The children especially love playing with the hinge, while they are sitting on my lap.


After a couple of months, and not being able to find any vintage folding chippy chairs ( I am still looking), I decided to paint the chairs I already had.


I sanded all 6 chairs and painted them fun, bright colors, red, green, purple, orange, turquoise, and yellow.

Thank you Martha Stewart paint samples.


The children love them , and it has helped Baylie with learning her colors.


I love how unique they are! It is not every day you walk into someones home, who has 6 different colored chairs.


I added a burlap table runner, with Turquoise strips (the DIY is coming on the runner.)


An IKEA white vase, with dried Hydrangea from my sisters garden, takes center stage on this one of a kind table.


Playing games around this table, and entertaining is so enjoyable.

Check out these links my table is linked up to.
The Thrifty Home            The Lettered Cottage

The Girl Creative        sew dang cute crafts

Funky Junk Interiors

Not just a housewife
    
blue cricket design

DIY CLUB

Its So Very Cheri

Krafty Kat

Crazy Domestic

Miss Mustard Seed


Until next time,
Melissa

12.17.2010

Hung With Care

When I see something I am smitten with, I rush home and attempt to make it.


Recently I was at a local herb show where there were many vendors. One of these vendors had some quilted stockings that I needed  wanted.


So when I got home, I rummaged through my material scraps, and came up with these lovely stockings.

These suckers were so easy to make.

The most time consuming part was cutting out all the triangle pieces.

I added some vintage lace, I purchased while at the herb fair.

Attached to a old piece of barn wood and these are exactly what I wanted.

The Snowflakes are beeswax I made a couple of years ago and they still smell great.


I love the vintage feel they have, I just hope Baylie and Mason love what is inside.


Linking up here
The Creative Crate
The girl creative
tea rose home


Until next time,
Melissa

12.16.2010

fire in the home

Half dressed during the Winter in our house is not an unusual site. Warmth from our wood stove ,heats our whole house, and I love it. Being that I sell Wood stoves as a part time job at Lehman's, can tell you, I absolutely love fires in the home.Sitting in silence and watching the fire swirl around  gives me such a calming feeling. Knowing that if the electric went out and we would still have heat gives me peace.The kids love playing outside in the snow, and then coming in for a sip of hot chocolate (loaded with marshmallows and sprinkles) by the stove.


Warming our boots by the toasty wood stove.


Speaking of hot chocolate here are some great ideas for you children's hot chocolate. Add a Candy Cane so you children can stir and lick.
Use Colorful sprinkles or crushed peppermint for a yummy topping.
Whipped Cream with chocolate shavings, and a sprinkle of cinnamon makes me even want to dig in.
 Buy tiny marshmallows at your local bulk food store, and mound handfuls of marshmallows into your child's drink.

-
Baylie drinking her first hot chocolate!
 I would love to hear what your favorite topping for hot chocolate is, so please share.


Until next time,
Melissa


12.15.2010

rising dough

While I'm in the kitchen, I always reminisce about my childhood, and the blissful food my dad always made. Waking up to the lovely smell of muffins baking in the oven, or homemade pizza dough rising. My love of baking and cooking is mostly derived from me trying to give my children those wonderful smells to remember. I enjoy trying new recipes, and adding to ones already perfected. Seeing the delight on my husbands face makes me want to live in the kitchen, and cook some of his favorite things. That is why today the children, and I made scrumptious bread sticks. They turned out great. Here are some pictures and the recipe. Try adding something new to this recipe, like drizzling with honey, or sprinkling with powder sugar, or maybe even wrapping dough around a mozzarella cheese stick. There is a plethora of things I could come up with that would taste oh so delicious.
RECIPE
1 pkg. active dry yeast

1 c. warm water 
1 t. salt

1/4 c. oil
3 c. all-purpose flour,divided
cornmeal
Dissolve Yeast in water;add sugar
salt and oil,stirring until dissolved. Add 2 cups flour; beat until smooth. Stir in enough remaining flour to form a soft dough. Knead for 6-8 minutes or until smooth. Place into greased bowl; cover and let rise for 1 hour; punch down. Divide into 12 portions and roll into strips. Place on greased baking sheet and lightly sprinkle with cornmeal; let rise for 45 minutes to one hour. Bake at 400 degress for 10 minutes or until golden. While baking put a pan of water in oven with breadsticks.


Baylie will lick anything we make.


Fun ways to get you children involved throughout the day is to let them help in the kitchen. Get them a chic little

Until next time,
Melissa

12.14.2010

Raise the Curtain

As I contemplated what my first post should be about, I finally came across a beautiful idea. One thing I loathe is clutter, and in the corner of my kitchen, I have chaos. Our kitchen is a bit on the tiny side, so I store items where I can find room. We are talking about onions on the shelves, potatoes, even a whale of a pale full of oatmeal on the bottom of my butcher block table. I needed to find a way to hide this disorder. So why not a curtain? Here is what I came up with.
Before ( Clutter Zone)


Measure, and pin everything before sewing.

Turquoise paint is a must have in my household


I cut out my own stencil, and painted.


One of my favorite vases!


I love the finished curtain. So clean cut.


Here are my 5 top reasons why I absolutely love my new curtain.
1. The chich curtain cleans up the kitchen. Did I mention how much I dislike clutter?
2. I have been trying to find a way to bring color into my kitchen, so it flows with my dining room. I think this is a start.
3. I adore the numbers.
4. My 14 month old son no longer throws everything on the floor. I am finally relieved of cleaning up onion skins, and oatmeal off the floor.
5. This project only took me 1 hour. Just enough time for me to do when the children are taking naps.

If you have a reason you love my new cutting table curtain, please feel free to post.

Until next time,
Melissa


You Might Also Like

Related Posts Plugin for WordPress, Blogger...