4.01.2011

Mason Bay Etsy Shop

It has been a while since my last post, but my time has been very valuable, the last few weeks. Every minute I have to spare, I spend with my children.


Here is a little something, I would love to share with you. I will try hard this next week to post more.


I started making hair accessories as a way to justify watching television in the middle of the afternoon. I have been selling them at my Etsy shop Mason Bay.


A while back my sister and I had decided to start making necklace's, earrings, and rings. We finally added the new cargo to our store.


I love designing the necklace's, and I get to spend time with my sister, so what could be better.


These are just a few of my favorites, so head on over to Mason Bay and check out the amazing necklace's and let me know which on is your favorite.


Don't forget, I'm still waiting for 115 to give away something lovely! 


Until Next Time,
Melissa

3.21.2011

Cake Pops

Once again, Im in a baking mood!


Im really not sure what is going on here, but I know my children and husband are loving it.


I love cake pops. I feel in love with these about 3 years ago. I made a red velvette one with cream cheese. Lets just say they were scrumptous.


This time I made Strawberry cake pops.


First you make a Strawberry cake, let it cool, and crumble it up. This is were the children come in. What child doesnt LOVE getting messy.


Next I added Strawberry frosting and mixed it up well. Roll into balls and put in the fridge for about an hour. I dipped the sticks into chocolate, and then put them into the balls. Next I put the balls into the fridge again.


Dip into white chocolate, and add sprinkles.


One blog that has amazing pops is Bakerella. You can do some amazing things. I was thinking a Veggie Tale pop would be awsome for a birthday party. Maybe for Mason party I will attempt them.


These pops are Strawberry delicious, and deffinitly worth all the work.


Parties Im linked to


Until next time,
Melissa

3.16.2011

Spring Cupcakes

Some months, I really get into baking. March has been that month.

Today I baked Chocolate cupcakes.


Spring colored frosting, looks so beautiful on the tops of the chocolate cakes.


In Martha Stewarts magazine, I seen some neat designs you can do with colored cupcakes. You could arrange them in different patterns for any type of occasion.


I put small chocolate chips on top of the frosting to top off the delightful cupcakes.


I can not wait for spring, so I am bringing it in with these wonderful colors.

Frosting Recipe,
cream together
1/2 c. solid shortening
1/2 c. butter
add remaining ingredients until well mixed.
4 c. powdered sugar
2 T. milk- I added a bit more.


I am still waiting to hit 115 followers, so I can give something wonderful away.

Parties Im linked to.
Night Owl Crafting
Someday Crafts
Somewhat Simple
Sew Much Ado
Moms Crazy Cooking
Remodelaholic


Until Next Time,
Melissa

3.11.2011

Easy Cherry Cheesecake

Let me first say, that my heart goes out to all the Tsunami victims. What a horrible event, and my prayers go out to them, that is all I can do, but prayer is something huge. We just have to remember that God is in control of EVERYTHING.


With all the snow today, I thought, I needed to make something fun and delicious.


Cherry Cheesecake in muffin cups sounded perfect. These amazing cheesecakes were so easy to make.


Recipe
2 8oz. Pkgs. cream cheese softened
3/4 c. sugar
2 eggs
1 t. vanilla extract
1 T. lemon juice
vanilla wafers
can of cherry pie filling
paper mini muffin cups


Blend first 5 ingredients together until light and fluffy; set aside. Place a vanilla wafer in the bottom of the paper lined mini- muffin cups. Fill each 2/3 full with cream cheese mixture; bake at 350 degrees for 20 minutes. cool; spoon cherry pie filling on top of each cheesecake.


According to my husband the cheesecakes were really yummy. So you really should try them. I'm not a huge dessert eater. But Im a huge fan of making them.


Until next time,
Melissa

3.09.2011

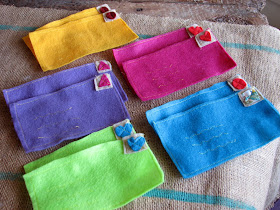
Colored Postcards

Mail Call!

Today Baylie and Mason delievered mail to Mr. Tiger, Pink Puppy, Tuck the turtle, and many other stuffed animals.


Felt mail was such a delight to make. I had several colors, which made the mail more exciting.


I used my sewing machine to sew around the edges and for the 3 center lines.


For the stamps, I cut out fun shapes out of fabric and felt.


I am having so much fun with the kids, playing mailman.

It is also a fun way to learn colors.

Now all I need is a awesome mailbag.


I am always looking for new ways to entertain the children, exspecially during the winter.
If you have any amazing ideas let me know.


Parties I am linked to.
Night Owl Crafting
Tea Rose Home
Beyond the Picket Fence
Sassy Sites
Somewhat Simple
Sun Scholars


Until Next Time,
Melissa

3.07.2011

Clothesline Calendar

It only took 2 months, but I finally had some time, to make myself a calendar.


I printed these adorable owl calendars off from My Owl Barn.


I attached the calendars to clothespins, and then clipped them onto a piece of hemp.


The best part of finally getting to a calendar, is that I am now motivated to get my desk area done.


Really, could these be any cuter?


I can not wait until spring, so I can start on my new desk.


I have amazing plans, that I can not wait to start on.

My sister and I, have also been working on my mothers dining room ,and I can not wait to show you the transformation when it is done.


Don't forget once I hit 115 friends I will be doing a free giveaway.


Parties I am linked to.
Polly Want a Crafter
Boggie Board Cottage
Making The World Cuter
Type A
Remodelaholic


Until Next Time,
Melissa

3.02.2011

spring pots

Spring is almost here, and it is time to start my plants.


 Today, I started cilantro and basil. My children really enjoyed helping me. Mason really had fun spreading potting mix everywhere.


I really think these plants deserve a nice container.


Stenciled numbers painted white, look amazing on the terracotta pots.


I printed lovely printables out from Creature Comforts.


Nice flags poked through the dirt gives them a little something special.


These turned out so lovely.
Now I cant wait for the herbs to start growing.


Parties Im linked to
Night Owl Crafting
Not Just A Housewife
Sew Woodsy
Someday Crafts
DIY by Design
Katies Nesting Spot
Ladybug Blessings
Paisley Passions
Sassy Sites
Shabby Nest


Until Next Time,
Melissa

2.23.2011

Lavender Sachets

Lavender reminds me of Summer, and I am patiently waiting.


So, today I wanted to make some lavender sachets.


I made these scrumptious apples.  The smell of lavender is bursting from them. I could maybe smell these all day.


I loved the first one so much, I made 8 more.

I'm sleeping like a baby, with these above our bed.


I also made one more out of an old arm chair cover.


This one is going in my clothes drawer, and maybe on some trips with me.


Who knows, maybe I will be giving these away soon.


Once I hit 115 followers, there will be something given to my awesome and amazing followers.


So tell everyone you know, so I can give something away already.


Parties Im link to.
Night Owl Crafting
Until Next Time,
Melissa

2.20.2011

Cake Batter Fudge

YUM, is the first thing I thought of, when I seen this yummy recipe.


I came across a wonderful recipe blog called Mrs. Bettie Rocker. How awesome is the name of her blog.


It took me about a second to decide, that I was going to make fudge for the first time ever.


So take 15 minutes out of your week, to make this scrumptious treat.

Ingredients
3 cups sugar
1 1/2 sticks margarine
5 oz can (2/3 cup) evaporated milk
12 oz chopped white chocolate chips
7oz jar marshmallow creme
3 or 4 Tablespoons yellow cake mix (just the powdered MIX, not batter)
1 teaspoon vanilla
Blue coloring
Rainbow sprinkles
Directions1. Line an 8 or 9 inch square pan with foil, leaving the ends hanging over the edges of the pan. Spray foil thoroughly with nonstick spray.

2. Place the sugar, margarine, and evaporated milk in a heavy saucepan over medium heat. Bring to a full rolling boil, stirring constantly, and let boil for 4 minutes. Remove from heat.

3. Add chocolate chips, marshmallow creme, and cake mix, stirring until chocolate chips are melted. Add vanilla and mix well.

4. Working quickly, pour about 1/3 of the fudge in a bowl and add a few drops of blue candy coloring, mixing and adding until you achieve the desired shade. Pour white fudge into prepared pan, spreading evenly. Spoon blue fudge over the top, spacing it out. Using a sharp knife, draw swirls through the blue and white to create a marbled effect. Sprinkle the top generously with rainbow sprinkles before the top sets up.

5. Let store at room temperature until cool, then place in the refrigerator until firm.


Around here Fudge is so expensive, because it is "Amish made".

I have fallen into this trap, but no more.


If you have a great fudge recipe, please feel free to share.


Parties Im linked to.


Until Next Time,
Melissa

Lovely Lamps

Today my Tree Trunk Lamp has been featured at Craft Gossip.


CraftGossip
 
 
I love opening up my mail, and having such a delightful email to look at.
 
 
There are other beautiful lamps that you need to take a look at. So pop on over to Craft Gossip, and take a look.


Until next time,
Melissa

2.18.2011

Almost a year ago

 While reading my sister blog, the The Wannabe Cottage, I came across this lovely post called ,Two of my favorite people.


Wow, have my two cuties already grown that much?


It made me want to cry and smile at the same time.


My sister was watching the children for the day ,and snapped some of the most lovely pictures.


I believe she has a great talent. What do you think?


The flowers make me want Summer so badly to come. It is in the 60's today.


But Ohio weather plays these little tricks on us. Next week there will be freezing rain.


Head on over to her blog, and check out the post, it is very adorable. Thanks Jenna for writing such a great post about my dear children.


Until Next time,
Melissa


2.16.2011

sweater dress

My first dress. YES!


If you read my last post, Cleaning the Closet, you would know, I was attempting to make a dress from one of my old sweaters.


After tons of redo's, I completed it.


What a beauty. I had to bribe my daughter to take a picture in it.


Safety was not my man focus today, but on top of the table, is the best lighting in our home.


I love the way it turned out. Now I am thinking I can make more clothing.


For the dress, I had to cut the sweater completely apart, and hand sew the dress back together.


I cut the sleeves completely off.


This is when I became worried.


I then cut the end part of the sleeve, and stitched it back onto the dress.


It took a lot of time, but I feel accomplished.


The best part of this accomplishment, is my daughter hates it. Notice the tantrum on the floor.


Its to itchy mom.
The zipper it touching me.
I cant get it off.
Its to long.


Hmmmm, do I force her to wear it to church?

Maybe some bubble gum will solve the problem.


Party link up
Paisley Passions
Beyond the Picket Fence
Type A


Until next time,
Melissa

2.14.2011

cleaning the closet

Shoving and pushing, to find a place in the closet was not happening anymore.


I decided to take everything out that I have not worn in the past 6 months, and donate it.


How did I forget that I had these beauty's?


After a few minutes, I decided to make a pillow.


I love how it turned out.


For the white sweater, I am attempting a dress for my daughter.


This project could take a while.


Now for my garage door headboard.


I think I have showed you my entire bedroom, but my headboard.


An old garage door. I seen the door, and had to have it.


I love the bolts and the chipped paint.


Now, I am looking for the perfect piece above the headboard.


If you have any great Ideas let me know.


Parties Im Linked to.
Polly Want a Crafter
Making the World Cuter
Sew Can Do
Faded Charm Cottage
The Shabby Chic Cottage


Until next time,
Melissa

2.09.2011

Seat Cushions

Seat Cushions finish off my daughters white table.


My plan is to slowly transform my daughters room.


As you have hopefully figured out, I LOVE color, and patterns.


What a fun challenge to combine patterns and colors together.


I quilted 4 different fun fabrics together.


I then stuffed with batting, and tied twine to the cushions.


The table was a gift, and was originally a light brown, so I painted it white.


I wish I would have taken a before picture, but of course I did not.


Baylie loves her new table, but she thinks the pillows are to sleep on. 


Hopefully the whole room transformation will be done by 2012.


I am giving myself plenty of time.


Until next time,
Melissa

2.07.2011

Funky Junk Copy Me

Copy Me Challenge


If you need some awesome ideas, these two blogs are where you can find just that.


Once these ladies hit 4000 followers, they put up a Copy me Challenge link party.


I added my Barn Door Table for Funky Junks Challenge.


My favorite piece in my home.
 
 
My thoughts were she will probably delete this picture. My confidence can be a bit low at times.


Instead She loved it. YES!


She actually had me on the front page today.
 
 
Check it out here Funky Junk Interiors.
 
 
There are some really great ideas that people are linking.
 
 
Until next time,
Melissa

2.03.2011

Winter Fun

Indoors has become very routine.


I am dreaming of digging in dirt, mowing the yard and walking to the park.


Until then, It was time to buckle down and get creative with the children.

Sock Puppets


Baylie and I made these two cuties. Miss Piggy, and Mr. Dinosaur.


They we so easy.'


All you need is a Big pair of socks, felt, and some stuffing.


We put on a puppet show for the men.


Mason just wanted to hit the puppets. 


She could not keep her head below the table. She tried so hard.


Tape City

While looking through blogs I found this great idea from Not Just a Housewife


I used all of Chris's Electrical tape to make a huge city.


What a great Idea. It really did entertain them for hours.


We had a parking garage, and at the other end, I put a doll house.


I even joined in with the fun. My two favorite cars.


I enjoyed my time with my children this week.


I think God sends us weather, to slow us down and enjoy the little things.


Parties Im linked to


Until next time,
Melissa